
Mortise and tenon joinery is often hailed as the “king of woodworking joints,” and for good reason. It’s a method of fitting two pieces of wood together – one with a cavity (the mortise) and one with a protruding tongue (the tenon) – forming a strong, interlocking bond without relying on metal fasteners. This classic joint has stood the test of time (literally millennia) and remains a cornerstone technique for furniture and timber framing. In this ultimate guide, we’ll explore the rich historical background of mortise and tenon joinery, compare traditional and modern methods, review the essential tools, walk through a step-by-step process to craft the joint, and highlight common mistakes (with tips to avoid them).
Historical Background
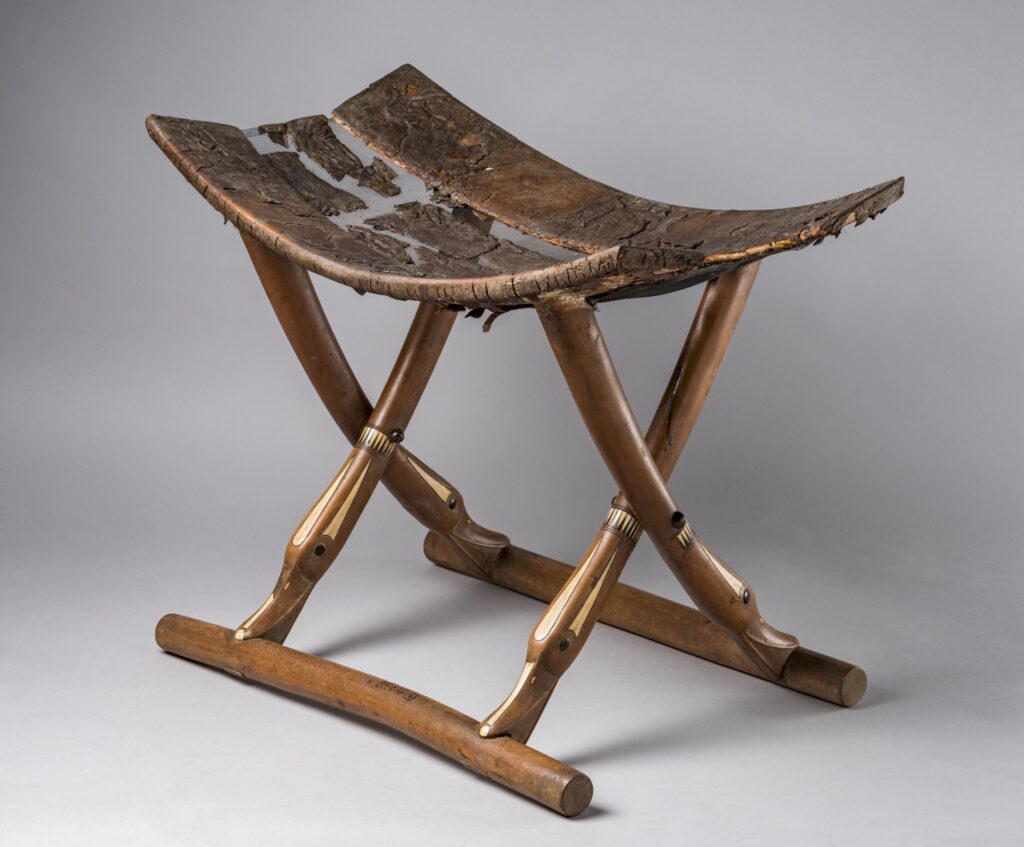
Folding stools like this were prized in ancient Egypt for their portability and often used by high-status individuals.
Mortise and Tenon: A Lesson In Durability
The mortise and tenon joint is truly ancient – woodworkers around the world have been using it for thousands of years. Archaeological evidence shows that one of the earliest examples dates back 7,000 years to the Hemudu culture in what is now China
This Neolithic-era find indicates that even early humans figured out that carving a hole in one piece of wood and a matching tongue in another could join them firmly (proof that good ideas stick around).
The joint independently appeared across different civilizations. In ancient Egypt, for example, mortise and tenon joints were used in furniture and even in large constructions. The famous Khufu ship (around 2500 BC) found buried near the Giza pyramids was assembled with planks joined by mortises and tenons.

No screws, just wooden parts locked together, sailing into eternity. Similarly, evidence of the joint has been found in Bronze Age shipwrecks like the Uluburun (14th century BC), and in many pieces of ancient furniture uncovered throughout the Middle East and Europe
Uses In Architecture
In traditional Chinese architecture, mortise and tenon joinery reached an art form: wooden beams, pillars, and brackets were intricately notched to interlock with perfect fit, holding up temples and palaces without a single nail or drop of glue

This clever construction allowed buildings to withstand centuries of use and even earthquakes, as the joints could flex with humidity and stress. (It’s humbling to think that those ancient builders were essentially playing 3D puzzles with huge timbers.) Even Stonehenge’s massive stones were shaped with mortise and tenon-like features: the builders carved knobs on the tops of uprights and corresponding sockets on the capstones to lock them in place
In short, from East to West and across eras, the mortise and tenon joint evolved as a go-to solution wherever wood needed to meet wood at right angles and stay put.
Mortise and Tenon Current Uses
Fast forward to more recent history, this joinery method continued to underpin timber framing in barns and houses through the medieval period and into modern times. Many 18th- and 19th-century pieces of fine furniture (tables, chairs, cabinets) owe their longevity to well-made mortise and tenon joints. The enduring popularity of this technique across cultures speaks to its effectiveness. While methods such as the cam lock are the standard way that right angled joints are joined together in flat packed furniture, for the serious craftsman the mortice and tenon are bedrock to ensure a piece of furniture holds up for generations. Today’s woodworkers have a direct link to an ancient craft. Working on a mortise and tenon can feel like shaking hands with history (a very snug, right-angled handshake, that is).
Different Methods: Traditional vs. Modern Approaches
There’s more than one way to create a mortise and tenon joint – in fact, ask ten woodworkers for their method and you might get eleven answers (each passionately defended). Broadly, though, methods fall into two categories: traditional hand-tool techniques and modern power-tool techniques. Both aim for the same result – a clean mortise and a well-fitted tenon – but they differ in tools, speed, and sawdust output.

Traditional Hand-Tool Methods
For thousands of years, mortises and tenons were cut entirely by hand. A craftsperson would carefully lay out the joint with pencils or marking gauges, then saw and chisel to shape. For the mortise, this often means drilling a series of holes (historically with a brace and bit) or simply using a chisel to chop out the cavity. A sturdy mortise chisel (thicker than a standard chisel) is ideal for this – you drive it into the wood with a mallet, levering out chips until you’ve squared up a neat hole. It’s a workout, but also a bit therapeutic – nothing says “I mean business” like hammering a chisel into wood.

The tenon is typically cut on the end of a rail or stretcher using a saw: you’d saw the shoulders (the flat parts that will sit flush against the mortised piece) and then saw down the cheeks (the faces of the tenon) to release the tongue of wood.
Tools like a back saw (tenon saw) or a Japanese pull saw excel at this, giving fine control for straight cuts. Finally, you’d fine-tune the fit with chisels or a shoulder plane so that the tenon slides into the mortise with a satisfying snugness. This hand-driven method requires patience and precision – as one old-time woodworker quipped, “cut to the line, not through it, and you’ll do fine” – but it yields great accuracy. Many purists still love doing it this way to feel the zen of craftsmanship (and perhaps to show off those impressive forearm muscles earned along the way).
Modern Power-Tool Methods:
Today, technology offers some electrifying shortcuts for making mortise and tenon joints. Instead of spending 30 minutes with a chisel in hand, you might spend a few seconds with a machine. For mortises, one popular tool is the hollow chisel mortiser – a dedicated machine that uses a drill bit inside a square chisel to literally punch perfect rectangular holes into wood. Mortisers allow quick, repeatable mortises, making them favorites in workshops that do a lot of joinery.
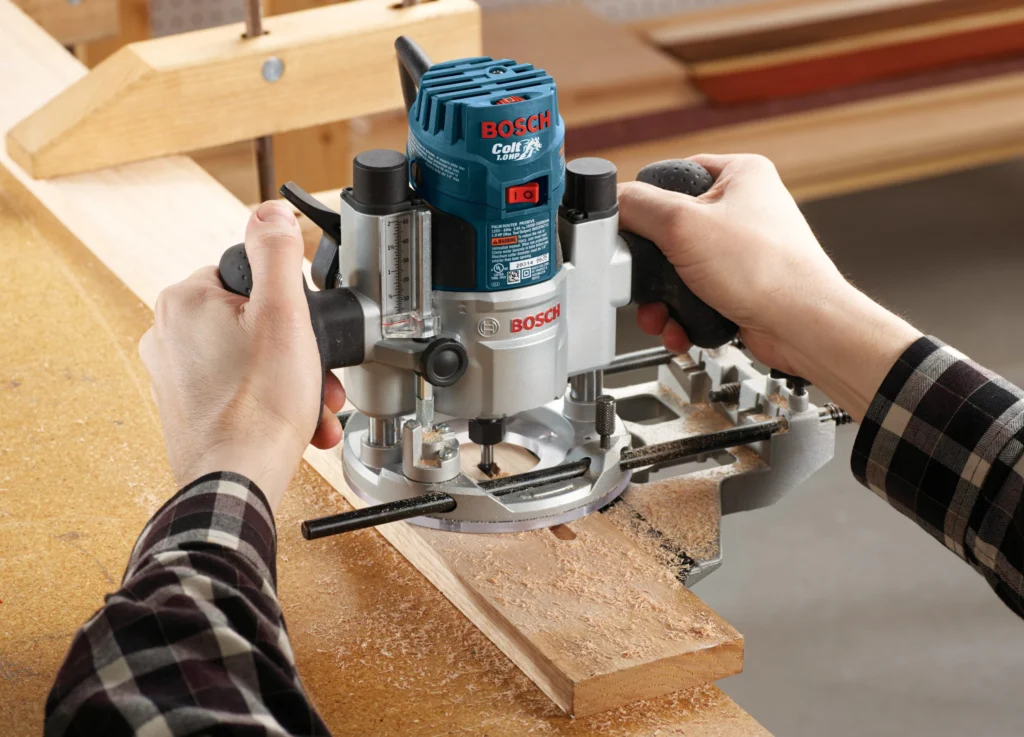
Another versatile approach is using a plunge router with an edge guide or jig: you can rout out a mortise by making multiple passes, achieving clean walls and flat bottoms.
A router’s high speed and an up-cut spiral bit will eject chips efficiently, though you may still square the corners with a hand chisel if a perfectly square hole is needed (routers cut round-ended slots). If you don’t have a router or mortiser, even a basic drill press can help – drill out the bulk of the waste and then chisel the remainder by hand.
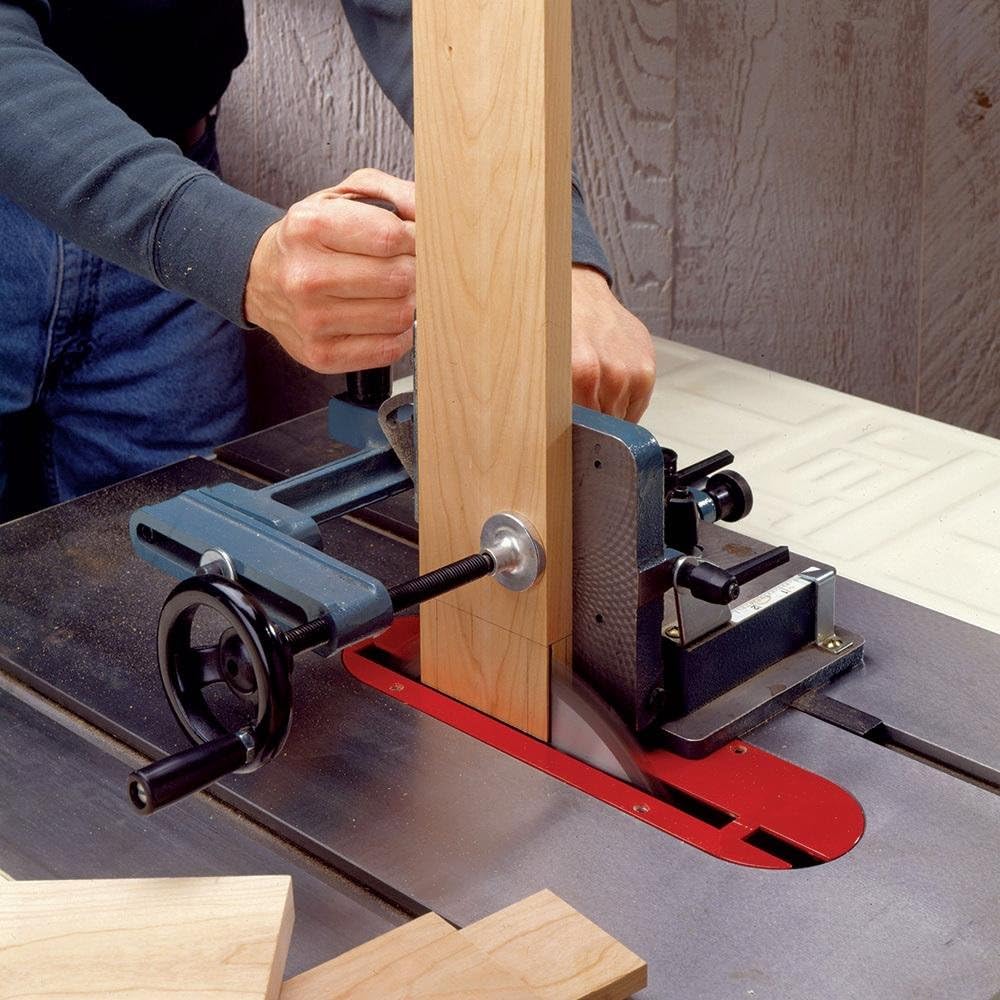
For tenons, modern shops often turn to the table saw. Using a tenoning jig or a simple sled, you can stand the workpiece upright and slide it through the blade to slice the cheeks of the tenon accurately. Alternatively, a dado blade (or multiple passes with a standard blade) can nibble away the tenon cheeks. A band saw is another option to cut the tenon cheeks and shoulders, especially for angled or curved tenons
After machine-cutting, some light cleanup with a chisel or shoulder plane may be needed, but the heavy lifting is done with a whirring blade instead of muscle.
Loose Tenon Joinery
Modern innovations have even introduced loose tenon joinery (like the Festool Domino system), where both pieces get a mortise and a separate floating tenon is inserted
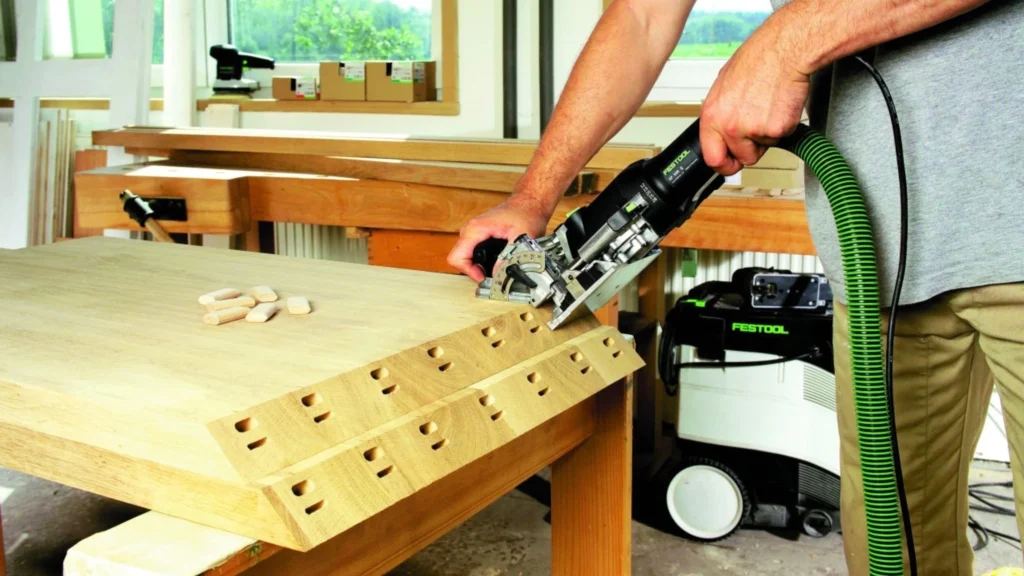
This isn’t the classic “one-piece into another” tenon, but it’s a close cousin and is prized for speed – essentially giving you a mortise and tenon in a few plunge cuts. Purists might joke it’s “cheating,” but the resulting joint is still wood-to-wood strong.
In summary, whether you choose to go unplugged with hand tools or fire up the power equipment, the goal is identical: accurate, clean cuts that produce a mortise and a tenon which fit together like puzzle pieces. Beginners are often encouraged to try the hand method at least once (it builds skill and character), but there’s no shame in using a bit of electricity to save time – even the old masters would likely have used a table saw if you gave them one! The key is to use methods that suit your project and comfort level. Small decorative frame? Hand tools might do fine. Building 20 chairs for your dining hall? You’ll probably want that router or mortiser humming along.
Tools Required for Mortise and Tenon Joinery
It’s important to choose the right tools for the job – a mortise and tenon joint demands precise cutting and fitting, so quality tools (and sharp blades) make a big difference. Here we’ll list the essential tools you’ll need, divided by hand tools and power tools. You don’t need absolutely everything on this list; rather, pick the tools that match the method you plan to use. For example, you might do all hand tools, all power tools, or a mix (many woodworkers drill or rout the mortise, then hand-cut the tenon, or vice versa).
Hand Tools
- Chisels (Mortise Chisel and Bench Chisels): Chisels are indispensable for mortise and tenon work. A mortise chisel is a beefy chisel with extra-thick blade designed to withstand pounding and prying in a mortise without bending. Standard bench chisels are useful for cleaning up and paring the sides of mortises and trimming tenon cheeks. Choose a width that matches your mortise (e.g. a 1/4″ chisel for a 1/4″ mortise). Keep them sharp – a sharp chisel slices wood fibers instead of crushing them, giving cleaner results (and it’s safer and less frustrating to use).
- Mallet: You’ll need a mallet (or hammer, though wooden mallets are preferred) to drive the chisel for mortising. This tool delivers controlled force. A mallet lets you chop repeatedly without marring the chisel handle. (Pro tip: let the weight of the mallet do the work – no need for a baseball bat swing, unless you want to mortise straight through your bench!)
- Backsaw or Tenon Saw: For cutting tenon shoulders and cheeks by hand, a fine-toothed backsaw is the classic choice. This could be a Western tenon saw with a rigid spine or a Japanese saw (like a dozuki) which yields very thin kerfs. The saw is used to make precise cuts along your layout lines. A dovetail saw can work for small tenons, while larger tenon cheeks benefit from a longer saw with deeper plate. The goal is a straight, controlled cut. Take your time and follow the marked lines – as the saying goes, “saw on the waste side of the line” to leave room for finishing to exact fit.
- Marking Gauge and Layout Tools: Proper layout is half the battle in joinery. A mortise gauge (a type of marking gauge with two adjustable pins) is used to scribe parallel lines that define the width of the mortise and tenon. This ensures the tenon thickness matches the mortise width. A combination square or try-square is used to draw shoulder lines (ensuring they are perfectly 90 degrees to the edge). A marking knife or sharp pencil helps mark exactly where to cut. Tape measures or rulers set the length of tenons and depth of mortises. In short: measure twice (or thrice), cut once. Accurate marking will save you from headaches later.
- Brace & Bit or Hand Drill: In traditional work, a hand-operated brace and auger bit can be used to bore out waste from the mortise before chiseling. It’s the old-school equivalent of a power drill. By drilling a series of holes within the mortise outline, you remove a good portion of the material, making it easier to then chisel the walls square. If you’re going pure hand tools, this is a handy trick to speed up mortising.
- Hand Planes (Shoulder Plane or Router Plane): These are more in the category of refinement tools. A small shoulder plane is fantastic for trimming the shoulders of tenons or shaving the cheeks for a perfect fit. A router plane (the hand tool, not the power tool) can clean the bottom of a mortise to an even depth or fine-tune tenon thickness. These tools aren’t required, but they are extremely useful for getting that final fit just right.
Power Tools
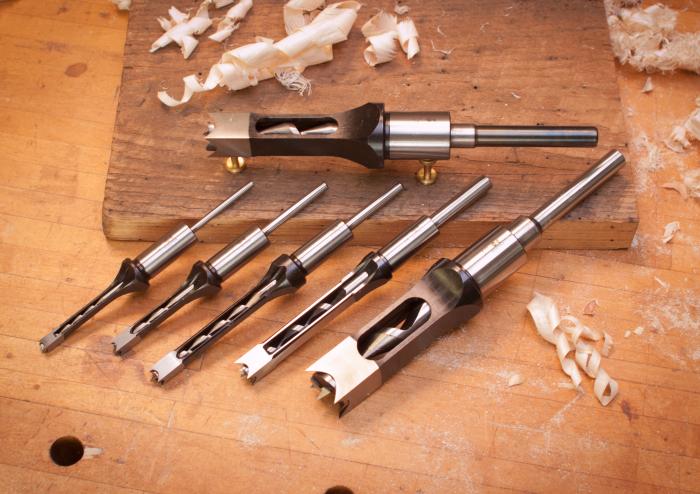
- Electric Drill or Drill Press: A power drill with a suitable bit (for example, a Forstner bit or spade bit) can quickly hog out the bulk of a mortise. If you have a drill press, even better – you can set depth stops and ensure the holes are perpendicular. You’ll still square up the mortise with chisels afterward, but drilling first saves effort. There are also mortising attachments for drill presses that effectively turn them into mortisers (with mixed reviews on efficiency), but it’s an option for occasional use.
- Plunge Router: A router is a MVP for many woodworkers. Fitted with an edge guide or a mortising jig, a plunge router can cut very clean mortises. Use a straight or spiral up-cut bit that matches the mortise width (e.g. a 1/4″ bit for a 1/4″ mortise), and take multiple passes, increasing depth gradually. The router’s speed ensures crisp edges. Just mind the noise and wear hearing/eye protection – routers tend to scream like a banshee, but the results are worth it. Routers can also cut tenon cheeks using jigs, or even cut tenons by trimming the entire shape (though that’s less common).
- Table Saw: The table saw is a versatile tenon-cutting machine. With a tenoning jig (which holds the workpiece vertically), you can cut the cheeks of a tenon by running it through the blade at a set distance. Alternatively, you can use a dado blade to batch out the cheeks by taking repeated passes (or a sliding jig to cut shoulders). Table saw tenoning is fast and repeatable – just ensure your jig is secure and your fingers are safely away from the blade. (Also, double-check your measurements – a table saw can also “quickly” ruin a piece if set incorrectly, as many a woodworker has learned the hard way.)
- Band Saw: A band saw can be used to cut tenons as well, especially if you’re doing a lot of identical cuts or working with thicker stock. You can saw down the cheeks and then cut the shoulders by laying the piece flat. The kerf is wider, so you might need to clean up the cut, but it’s a fairly safe and controlled way to shape a tenon. Some woodworkers prefer the band saw for tenons to avoid the loud table saw and spinning blade risk.
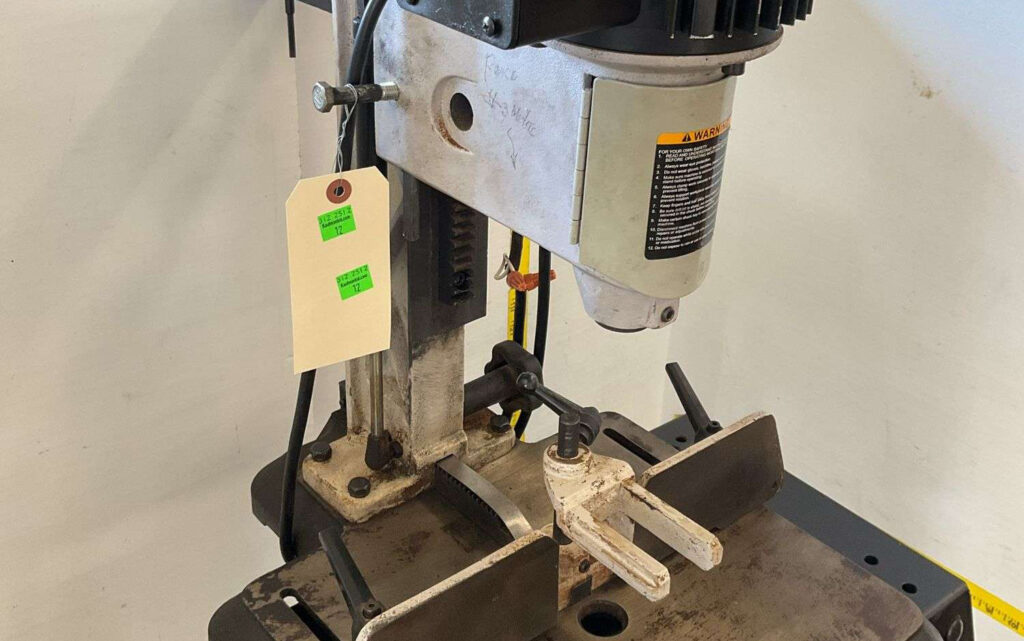
- Hollow Chisel Mortiser: This dedicated machine is a dream if you cut mortises frequently. It uses a square hollow chisel with a drill bit inside it. As you lever the chisel down, the spinning bit removes material and the chisel’s sharp square edges pare the sides of the mortise cleanly. The result: a square hole in one stroke. Mortisers excel at making repeatable mortises of consistent depth and width – great for chair or table production. The downside is they’re single-purpose and can be pricey for a hobbyist. But if you have one, mortising becomes almost fun (as long as you keep those hollow chisels sharp).
- Oscillating Multi-Tool or Chisel Gadgetry: While not common for classic joinery, some DIYers with fewer tools have improvised with oscillating tools to square up corners, or used specialized jigs (like the pantorouter designs) to cut both mortise and tenon. These are more exotic options – the standard power lineup usually is drill, router, saw, or mortiser.
When selecting tools, consider the scale and volume of your project
If you’re making one-off joints occasionally, you can get by with a drill and chisels or a router. If you’re embarking on a big project (say, a dozen chairs or a timber-frame shed), investing in a mortiser or good table saw jig will save you time. Also, consider personal comfort – some folks simply enjoy hand tools more (less noise, dust, and a certain peace of mind), while others love the efficiency and precision of machines. There’s no wrong choice as long as the end result is a sound joint. And remember, even with power tools, you’ll usually still need a sharp chisel on hand for final fitting – the chisel is like the referee that ensures the mortise and tenon relationship is just right.
Step-by-Step Guide to Crafting a Mortise and Tenon Joint
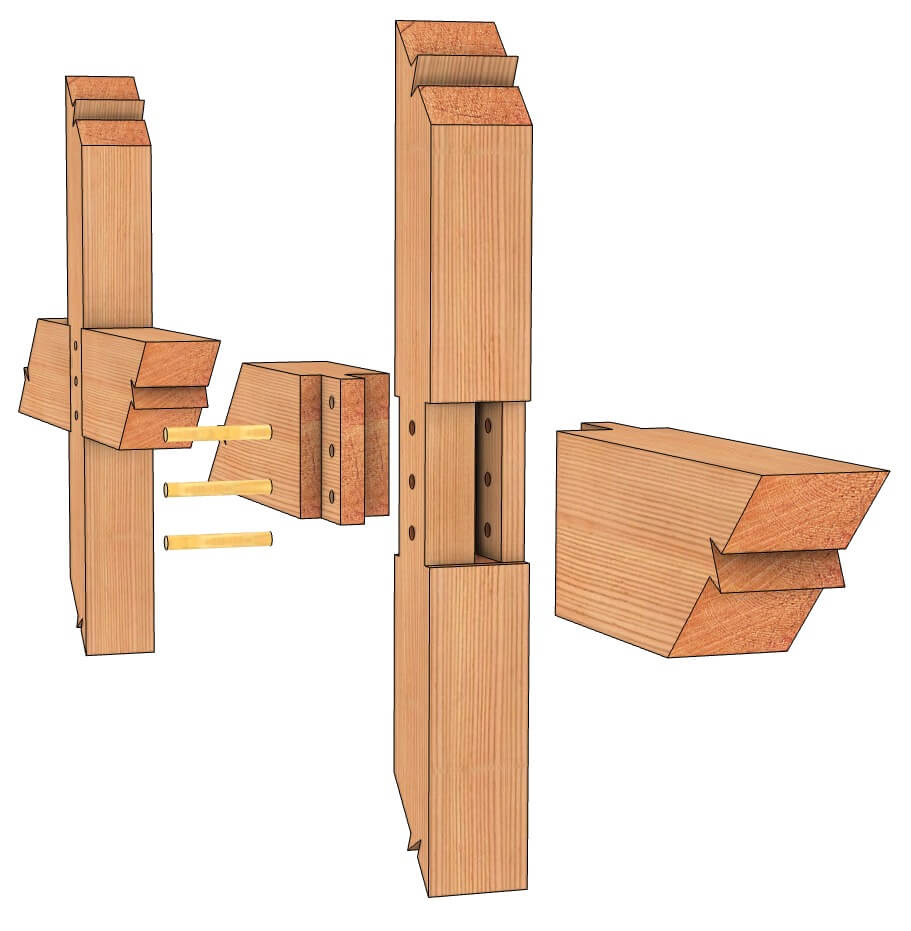
Crafting a mortise and tenon joint is a bit like following a recipe: you need the right ingredients (tools and wood), a plan to combine them, and a dash of patience. In this step-by-step guide, we’ll assume you want to make a basic blind mortise and tenon (the tenon does not protrude through to the other side). This is the most common variety used in furniture. The process can be adapted for through-tenons or wedged tenons, but start with the basic form to master the essentials. Remember the golden rule: always cut the mortise first, then the tenon to fit
It’s easier to fit your tenon to your mortise than the other way around.

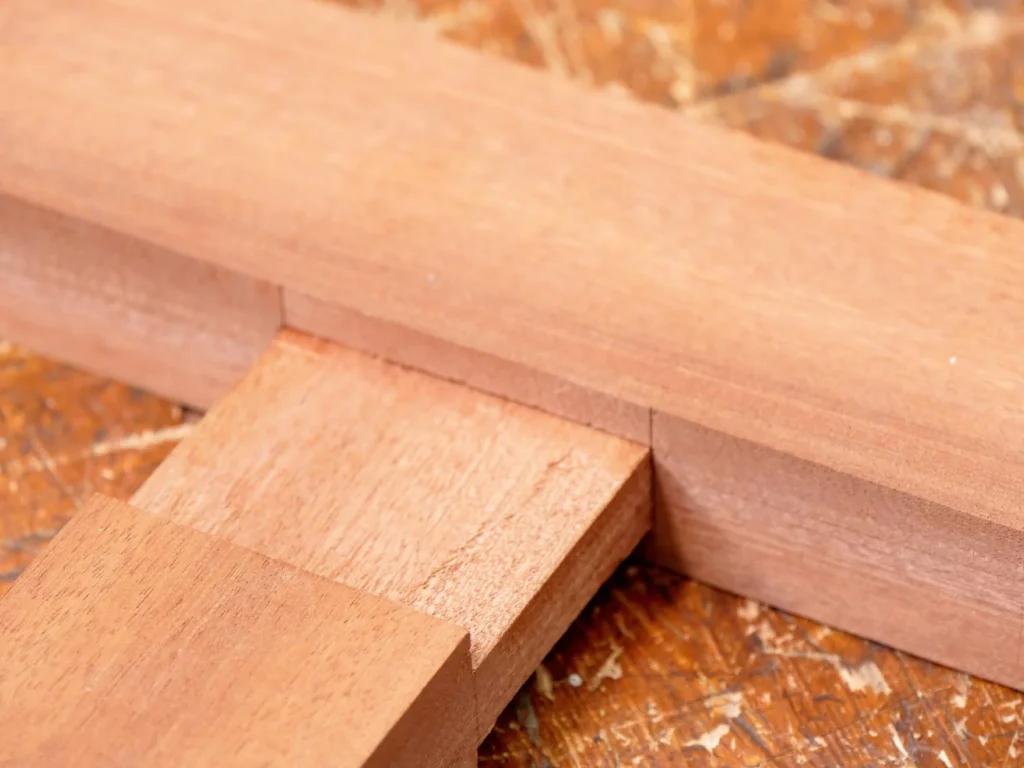
This is our goal: two pieces that will join at a right angle, with shoulders of the tenon piece fitting cleanly against the face of the mortised piece.
Now, let’s dive into the steps:
- Plan and Mark the Joint – Good preparation makes all the difference. Decide the size of your mortise and tenon. A common guideline for a strong joint is to make the tenon about one-third the thickness of the workpiece. For example, in a 3/4″ thick board, a 1/4″ tenon (and mortise width) is a safe bet. Also consider the tenon length. Aim for a tenon length about half the width of the mortised piece (so it goes in deep enough, but not too close to the far edge). Once you have dimensions, lay out the mortise on the first piece. Use a marking gauge to scribe parallel lines for the mortise’s sides, and a square to draw the mortise’s ends on the surface. Mark the corresponding tenon on the mating piece: mark shoulder lines around the stock and the tenon cheeks on the end grain.
- Pro tip: Mark from the same reference face on both pieces (usually the face side or edge side of your boards) – this way, even if your stock thickness is off by a hair, the joint will still line up flush on the reference side. Double-check all marks. A little light humor here: think of marking like drawing a treasure map – if you smudge or misdraw the “X,” you’ll be digging (or cutting) in the wrong spot! So take your time and make the layout clear and accurate.
- Cut the Mortise – Start with the mortise, since it’s essentially the “hole” that the tenon must fit. How you cut it will depend on your tools (hand vs. power):
- Hand-tool method: Secure the workpiece firmly (in a vise or with clamps). If using a drill to remove waste, drill a series of holes within the mortise outline, staying slightly shy of the lines. Then, take your mortise chisel and begin chopping. Start a little bit away from one end, not right on the edge, to avoid busting out the end grain. Drive the chisel in, then lever out a chip, and repeat, working your way along the mortise. Keep the chisel perpendicular and use its width as a guide between your scribed lines. Gradually deepen the cut in passes. Finally, square up the ends: put the chisel right on your end mark and chop down to make a clean end wall. Clean any remaining debris from the bottom. You should now have a neat rectangular pocket.
- Power-tool method: If using a router, clamp guides or use a jig to center the cut, and plunge in shallow increments (e.g. 1/4″ depth at a time) until you reach the desired depth. Move the router to shave the full length of the mortise. You might square the rounded corners with a chisel if needed. If using a hollow chisel mortiser, line up the chisel, pull the lever, and let the machine do its magic – usually multiple plunges along the mortise length are needed, overlapping to clear the entire slot. With a drill press, drill out overlapping holes and then chisel the sides and ends square. However you do it, test the depth (with a depth gauge or by inserting your chisel blade and marking it) to make sure you’ve gone deep enough for the tenon, plus a tiny bit extra if it’s a blind mortise (a little extra depth ensures the tenon doesn’t bottom out due to excess glue or slight length differences). A good mortise has smooth walls, square corners, and consistent depth. Give yourself a pat on the back – the “hard part” is done.
- Cut the Tenon – Now to shape that matching “tongue” on the other piece. Tenon cutting by hand: Place the piece in a vise. Using your saw, carefully cut along the waste side of the shoulder lines across the face and back (these are the short cuts that establish the tenon’s length/thickness). Then make the cheek cuts: saw down from the end following the layout lines that define the tenon’s thickness. It often helps to cut the cheeks first: saw down the cheeks to the shoulder line (don’t go past it) on both sides of the tenon. Then the waste can be removed, and your tenon should pop out as a rectangular prong. You can also saw off the two side cheeks (if your tenon has a smaller width than the stock) and end up with the rough tenon. Using power tools: If you have a table saw, set up your tenon jig or miter gauge. Cut the shoulders by laying the piece flat and nibbling a shallow cut at the shoulder location (or use a crosscut sled). Then cut the cheeks by standing the piece vertical (using a tenoning jig or clamp it to a miter gauge) and passing it over the blade at the correct offset. Flip to do both cheeks. A dado stack can remove the cheeks in one go if set up precisely. A band saw can similarly cut down the cheeks, then you’d cut the shoulders with a horizontal cut. With router jigs, you might rout the tenon cheeks using a guided template, but that’s less common. No matter the method, after cutting, you’ll likely refine the tenon with hand tools: use a chisel or a shoulder plane to clean the shoulders (they should be crisp for a tight visual fit) and to shave the tenon thickness if needed. Pro tip: Test the fit as you approach final thickness – the tenon should slide in with firm pressure but not require pounding. (If you find yourself reaching for a sledgehammer, something’s wrong!)
- Test Fit and Adjust – Moment of truth: insert the tenon into the mortise without glue to check the fit (this is called a dry-fit). Ideally, it should go in all the way and the shoulders of the tenon piece should snug up against the mortised piece with no gaps. If it’s too tight and won’t go in fully, don’t force it – remove and inspect for rub marks on the tenon (they’ll show where it’s binding). Trim those shiny spots with a chisel or plane. If the tenon slides in too easily and feels loose or wiggly, that’s a concern – a loose fit can weaken the joint. You can shim a slightly loose tenon with a bit of veneer or sawdust-and-glue, but it’s best to have it snug from the start. Aim for a fit where the tenon can be inserted most of the way by hand and perhaps needs a few light taps with a mallet to seat fully. Also check that the pieces meet at the correct angle (typically 90°) – if your shoulders were cut square and your mortise was straight, you should be in good shape. It’s normal to iterate a bit: fit, trim, fit again, until it’s Goldilocks “just right.” This step separates a professional-looking joint from a shoddy one, so take the time to fine-tune. (And hey, if you accidentally trim the tenon a hair too much and introduce a tiny gap – we won’t tell if you mix a pinch of sawdust with glue to fill it!)
- Glue-Up and Assembly – If everything looks good in the dry fit, it’s time to make it permanent (unless you’re doing a purely mechanical joint like a wedged tenon, but that’s advanced joinery). Prepare some good wood glue (PVA glue is standard for woodwork). Apply glue to the tenon and the mortise – coat the tenon cheeks and the mortise walls. A small brush or even your finger can help spread it evenly. Be careful not to use too much glue; when you insert the tenon, you want a bit of squeeze-out, but excessive glue can make it hard to fully seat the tenon or leave a mess. If it’s a blind mortise, avoid filling the bottom with glue – it has nowhere to go and can prevent the tenon from seating (the dreaded hydraulic lock). Many woodworkers put glue on the mortise walls and tenon cheeks, but not on the tenon end, to avoid trapping air or glue at the bottom. Now push the joint together. It should still go in as before, just a tad more slippery. Use clamps to bring the shoulders tight if needed. You’ll likely see some glue squeeze out at the seam – wipe it off with a damp rag promptly. Clamp the joint firmly and ensure the assembly is square (use a square or measure diagonals). Keep it clamped until the glue cures as per the glue’s instructions (usually at least 30-60 minutes for initial set).
- Reinforcement (Optional) – A basic glued mortise and tenon is very strong on its own. But for belts-and-suspenders (or decorative flair), you can pin or wedge the tenon. Pinning involves drilling a small hole through the joint (either fully through or hidden partway) and hammering in a wooden dowel or peg. This acts like a locking peg – common in timber framing and in mission-style furniture, where the pins are visible. Wedging is used with through-tenons: after the tenon sticks out the other side, you saw a kerf in the tenon end and drive a small wedge into it, which expands the tenon and locks it in the mortise (think of it as the wooden equivalent of a wall anchor). These techniques can be overkill for a casual project, but they are traditional methods to make a joint mechanically locking and add charm. If you do add a pin or wedge, do it while the glue is drying or after, depending on the method, and trim any excess flush once everything is set.
By following these steps, you should end up with a tight, strong mortise and tenon joint. For beginners, it’s wise to practice on scrap wood first. Expect that your first few joints might be a bit loose or gappy – that’s okay! Woodworking is all about practice. As you repeat the process, your sawing will get straighter and your chisel aim truer. Before long, you’ll be crafting joints so nice that you’ll want to show them off (or at least you won’t hide them at the back of a project).
One last tip: patience and precision are key. Even with power tools, rushing a cut can ruin the joint. As a light-hearted reminder – the mortise and tenon is basically a wooden marriage; you want both partners (the mortise and the tenon) to be made for each other. So take the time to ensure a good match, and you’ll avoid any arguments (or gaps) when they come together!
Common Mistakes and How to Avoid Them
Even experienced woodworkers have moments where a mortise and tenon joint doesn’t go as planned. Here are some frequent mistakes and pitfalls – and advice on how to avoid or fix them – so you can learn from others’ mishaps instead of your own.
- Mortise Too Deep or Tenon Too Long: It might be tempting to cut the mortise extra deep “just because,” or you accidentally cut the tenon a smidge too long. A mortise that’s significantly deeper than necessary (or a tenon that bottoms out in the mortise) can actually weaken the joint Why? Excess depth can reduce the wood left at the bottom (in a blind mortise) or just waste time and glue. And a tenon that hits the bottom of a mortise will prevent the shoulders from closing up tight. How to avoid: Mark your intended depth clearly (use tape on the drill bit or chisel as a depth stop). If it’s a blind mortise, you can give yourself perhaps 1/16″ extra depth beyond tenon length for glue space, but no more. Trim tenon length as needed during fitting so it doesn’t bottom out – the shoulders, not the tenon tip, should determine the seating. If you do end up a bit too deep, it’s usually not a structural disaster (unless you went through when it was meant to be blind – oops), but try to stay consistent. And if a tenon is cut too long, better to trim it than to deepen the mortise further in most cases.
- Loose Fitting Joint: You slide the tenon in and… it’s a touch sloppy, maybe it even rattles if you move it. A too-loose joint has less surface contact and can weaken the structure. Causes: this often happens from over-zealous trimming or sawing on the wrong side of the line, making the tenon too thin, or if the mortise was accidentally widened. How to avoid: Sneak up on the fit – it’s easier to remove material than to put it back. When sawing tenon cheeks, err on leaving them a hair fat and trim down gradually. Use your mortise chisel as a gauge: the chisel that cut the mortise should slide into the mortise snugly; use that same chisel to test the width of your tenon by holding it against the tenon – it should be the same width. If you already have a loose fit, not all is lost: you can glue in a thin shim on one cheek of the tenon and recut it, or use epoxy mixed with wood dust as a gap-filling glue. In less critical pieces, a loose joint can be locked with a wedge or pin. But strive for snug fits – your furniture (and pride) will thank you.
- Too Tight (Oversized Tenon): The Goldilocks dilemma – too loose is bad, but too tight isn’t great either. If you have to hammer with excessive force to get the joint together, you risk splitting the mortised piece or getting the tenon jammed halfway. Wood can crack if a tenon is forced in, especially if the walls of the mortise are thin. How to avoid: Test fit frequently as you fine-tune the tenon. You want resistance, but not outright refusal. If you see the wood starting to split or hear ominous cracking sounds – stop! Remove the tenon and shave it slightly. A pro trick is to look for crushed wood fibers on a test insertion – those shiny burnished spots on the tenon indicate where it’s rubbing too hard. Pare those spots with a chisel. Also, ease the very ends/edges of the tenon with a slight chamfer – this helps it start into the mortise. If, despite caution, you end up with a stuck tenon that only goes part way, you might carefully saw it off, remove the piece, and try again (a nightmare scenario, which we avoid by careful incremental fitting). Remember, snug is good, seized is bad. The ideal fit: you can press the joint together by hand most of the way, and a light mallet tap seats it fully, with no gaps.
- Inconsistent Layout & Misalignment: Perhaps the mortise on one piece was laid out from the wrong face, or the tenon shoulders were marked at the wrong length – the result is a joint that doesn’t align with the rest of the project. For example, the faces of the two pieces are offset, or there’s a gap at one shoulder because the tenon wasn’t centered correctly. How to avoid: Always mark your joints from the same reference surfaces on your stock. Use story sticks or consistent measurements for repetitive joints. Double-check before cutting that the mortise and tenon locations correspond exactly – a common mistake is marking a mortise at one location on a leg and the tenon on the rail at another location (result: they don’t meet). Also, cutting shoulders crooked or not 90° will cause gaps. Use a square to guide your saw for shoulder cuts, or create a knife-wall to guide the first cut. If you do end up with a small shoulder gap, you can sometimes fix it by paring the shoulder or even tightening the joint further. But major misalignments are tough to correct after the fact – prevention at layout stage is key. Take the time to measure and mark carefully; you’ll save hours (and heartache) later.
- Ignoring Wood Movement (in Wide Panels): This is a subtler mistake that might not be obvious until seasons change. If you’re joining wide pieces (like rails into wide legs, or table aprons into thick posts), remember that wood expands and contracts across the grain with humidity. A super snug joint across the grain, or multiple tenons in a cross-grain situation, can cause the wood to crack over time if it can’t move. Traditional frame-and-panel construction often leaves a bit of room (like a haunch or a shallow mortise beyond the tenon) to allow movement. How to avoid: For most average-sized mortise and tenons in furniture, this isn’t a huge issue, but in large panels or doors, consider leaving a small gap at the tenon’s end in a blind mortise, or use a haunched tenon which strengthens the joint while respecting wood movement. Also, don’t glue the entire width of very wide tenons if they go into something like a breadboard end – often only the middle is glued so the sides can expand. In timber framing, joints are often left unglued specifically to allow movement and disassembly. The takeaway: be mindful of your wood and its natural behavior. A joint that’s too rigidly locked in all directions might self-destruct down the road. Give wood the tiny freedom it needs, and your joint will hold together happily through the seasons.
By anticipating these common mistakes, you can approach mortise and tenon joinery with confidence. And when (not if) you make a mistake – don’t panic. Even master woodworkers occasionally cut a mortise on the wrong side of a layout line or saw a tenon a tad too thin. The trick is to learn and adjust. As one mentor might reassure: “Mistakes in wood are just design opportunities in disguise.” While you probably can’t spin a gap into a feature quite as easily, you can often recover from errors with a clever fix or two. Best of all, each slip-up trains your eye and hand to do better next time. Soon, those mistakes will become much rarer.
Conclusion
Mortise and tenon joinery combines strength, simplicity, and tradition. It’s amazing to think that when you cut a mortise and tenon today, you’re participating in a craft honed by countless generations before us – from ancient Chinese temples and Egyptian stools to modern timber frame homes and artisan furniture, this joint has literally held things together through the ages. We’ve covered the journey of mortise and tenon from its historical roots to the array of methods and tools available now. Whether you prefer the whisper of a hand saw and chisel or the buzz of a router and table saw, the fundamental principles remain the same. Mastering this joint opens the door to building sturdy chairs, tables, doors, frames – practically any wooden structure that needs a reliable 90° connection.
As you practice and refine your technique, remember to keep a balance of precision and patience (with a sprinkle of humor to stay sane). There will be challenges – the occasional stubborn tenon or off-kilter mortise – but the satisfaction of hearing that “thunk” of a well-fitted joint coming together is worth it. This guide has given you the blueprint; now it’s your turn to grab some wood and start cutting. Measure carefully, cut confidently, and soon your mortise and tenon joints will be the envy of your woodworking friends. After all, when you can join two pieces of wood so solidly that they become one, you’ve truly joined the ranks of woodworking tradition (pun intended!). Happy building, and may your mortises be square and your tenons true!