
Sash window repairs and weatherstripping can seem like a daunting task. I won't sugar coat it, its not a job you can just wing with a few spare hours on a weekend. This guide will clarify window components, so you understand exactly how your windows work and how to fix them.
Learning these skills will save you money and help maintain your home's historic charm. If you realize you are not up to the task and would a professional assessment, contact us here.
If you are in the San Luis Obispo vicinity, we offer restoration and replacement services, if you are outside our normal service area you can still order a replacement window sash if yours are past the point of being repaired.
Understanding Double-Hung Sash Windows
Double-hung sash windows, appreciated for their classic appearance and practicality, have two vertically sliding sashes, allowing ventilation and easy cleaning. Most historic double hung windows that were created between the late 1800s until about 1955 were built in a very similar fashion.
The sash was meant to be removed by taking off the casing from the inside. In order to get to the upper sash you must remove the parting bead. This piece is typically held in with a few finish nails, but sometimes it can also be covered in paint, making it more difficult to remove. The parting bead can usually be removed without breaking it but in case it does break or it is worn and needs replacement, have wood on hand to cut a new one.
Components of a Window

The parting bead can usually be removed without breaking it but in the case it does break, make sure to have wood and a table saw so you can make a replacement.
- Lower Sash: The movable bottom window pane.
- Upper Sash: The movable top window pane.
- Sash Cords: These attach to the counter weights hidden behind the jam and make lifting the window sashes easier.
- Jamb: Component forming the sides of a window frame. It supports and guides the window sashes, holding them securely in place and providing structural integrity to the window. In double-hung windows, jambs often contain channels or tracks that allow the sashes to slide smoothly up and down.
- Counterweights: Hidden within the frame, they counterbalance the sashes.
- Meeting rail: The meeting rail is the upper rail on the lower sash and the bottom rail on the upper sash.
- Casing: The trim that covers the gap between the drywall and jamb
- Parting bead: Wooden strips securing and separating the lower and upper sash
Common Sash Window Issues
Sash windows can develop a variety of issues over time, typically caused by age, exposure to the elements, or previous repairs. One of the most frequent problems is sticking sashes, often due to paint buildup or slight warping, which can prevent smooth operation. Another issue is broken panes, commonly resulting from a sash being slammed shut after the cords that support it have broken, causing the glass to crack under impact.
Cracked or deteriorating glazing is also a typical concern. The putty that seals the glass in place can dry out or become damaged, especially when exposed to water. This leaves the sash vulnerable to leaks and further deterioration. Frame damage, particularly wood rot, usually occurs from long-term moisture infiltration and can weaken the overall window structure. Broken sash cords limit the movement of the window, making it difficult to raise or lower the sash effectively. Lastly, drafts are a frequent complaint and are typically caused by gaps between the upper and lower sash or between the sash and the jamb, which allow outside air to enter and affect interior comfort.

Tools and Materials Needed"
If you are going to repair some minor wood rot, chip paint, reapply glazing putty, and install weatherstripping, you will need some tools and materials
It's advisable to have either some plastic or plywood you can secure in your window opening temporarily while you are working on it.
| Essential Tools | ||
| Screwdrivers (Phillips and Flathead) | For removing screws. | |
| Table Saw | For making a new parting bead or casing if it breaks. | |
| Miter Saw | Cutting the parting bead to length. | |
| Pliers | For gripping and pulling tasks. | |
| Hammer | If putting in bronze spring weatherstripping. | |
| Tin Snips | For cutting bronze spring weather stripping. | |
| Putty Knife | To scrape old paint and glazing. | |
| Carpenter’s Square | Ensures proper alignment. | |
| Essential Materials | ||
| Thin Penetrating Epoxy | Repairs damaged wood. | |
| Glass | If you plan on removing the glass, order replacement ahead of time or use a temporary insert. | |
| Glazing Putty | Secures glass panes. | |
| Finish nails or brad nails | Used to reattach the casing and parting bead. | |
| Caulk | To cover any gaps between the casing and wall. | |
| Paint | To touch up casing after it is reinstalled. | |
| Weatherstripping | Options include kerf weatherstripping and metal weatherstripping. | |
| Safety Gear | ||
| Gloves | Protection against sharp edges. | |
| Dust Mask | Prevents inhalation of debris. | |
| First Aid Kit | Handy for minor injuries. | |
Step-by-Step
Preparing for Removal:
- Clear your workspace.
- Use a utility knife to cut through paint and caulk around the casing
- Gently pry the casing off once the caulk and paint is cut.
- Use a thick palette knife to get in between the casing

5. Use shims to create space between the casing and then a pry bar to gently pull out the nails
6. Using pliers to grip the parting bead, duck bill pliers work best if you want to keep the parting bead intact. try to gently wiggle it loose without breaking; it is typically held in with finish nails.

Safe Sash Removal:
- Gently remove the interior stop from the frame.
- Pull out the lower sash; use care if painted shut.
- Detach sash cords carefully, they are typically held in with screws. Tie a large knot or insert a nail to keep the sash cords from getting pulled into the jamb. If the cords are broken or show signs of heavy wear, you can replace them with these.
Handling Removed Sashes:
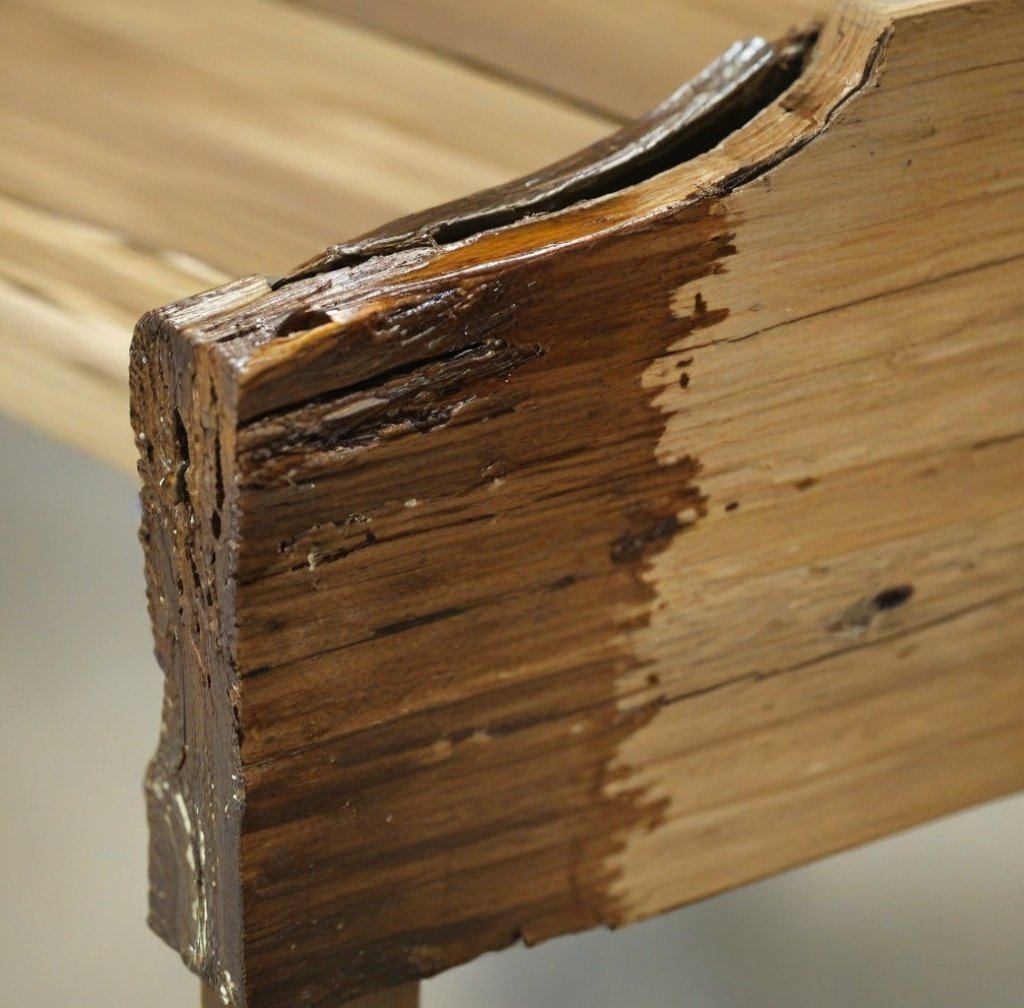
- Inspect for damage and for signs of rot and termite damage
- Store safely, it is a good idea to label all sashes you have removed to make sure they go back in the same way they came out.
Inspection Stripping:

- Using penetrating epoxy to stabilize and harden any areas with rot
14. Use Bondo or another wood filler in areas that need it.
Replacing Glass, Reglazing
If you are replacing any glass panes and reapplying glazing putty, depending on the ambient temperature and the humidity level. You will likely need to wait several days, if not longer, before the putty has skinned over and is ready to paint. This putty will be ready for paint in a fraction of the time but it does come at a higher cost.
Applying glazing can be done by hand to first get the putty into place. Then, using a putty knife, the excess can be trimmed off.

Fresh glazing putty applied to secure the glass in a restored sash window.
Damaged Casing
If maintenance on your windows has been neglected for some time, you may find rot or damaged casing as well. Some casing profiles can be very particular, and if you don't have experience milling custom profiles, you may need the help of a professional carpenter.
 New window casing milled to match original sash window profile.
When installing new casing, it's helpful to have a small block plane, wood filler like Bondo, and sandpaper to create a smooth, seamless transition. For finishing, start with a high-quality oil-based primer to protect the wood, then apply multiple coats of paint for lasting durability—making sure each coat dries completely before adding the next.
Understand Weather Proofing Your Windows
It's a common misconception that older single-pane windows are, by their nature, drafty and can't be weather-proofed. To understand how weatherstripping on a window is designed to work, let's look at some detailed section cuts.
This is the view of a window sash looking straight down.

There are two types of metal weather stripping, Spring Bronze and V Bronze or Cushion Bronze, as it is sometimes referred to as
Spring Bronze Aluminum Nail-on Weatherstripping
There are loads of weatherstripping materials on the market and it can be overwhelming if you are trying to figure out what to use and how to use it. Spring bronze weatherstripping works by maintaining tension between the window sash and the jamb.

This type of weather stripping is cut with tin snips. It's also advisable to bend in any sharp edges or corners.

V-Bronze Weatherseal
The main difference between V-Bronze and Spring bronze is the shape and the size of gaps that v-bronze can seal. While Spring bronze is essential just a single piece of metal slightly bent to make contact with the window sash. V-Bronze is bent in on itself, in ....what do you know a V! This gives it more rigidity and the ability to seal wider gaps.

Like spring bronze, V-bronze comes in a range of widths—from ½” up to 1 1/8”. It is not as readily available and typically comes in pre-cut sizes rather than rolls since it is much stiffer than spring bronze. The V-Bronze from Pemko comes in 5/8", 7/8" and 1 1/8" widths and is available in 8ft (96") sections.
V-Bronze often times is used on doors, but it can work with windows as well.

Another advantage of V-bronze is that it needs fewer nails than traditional spring bronze, something you will appreciate after you have had to put in 100 nails. The recommended installation is still a nail every 2", but I have found that a nail every 8" to 10" with additional nails at both ends is sufficient.
Combining Weather Stripping
This will likely be overkill for most people, but it is also possible to combine several types of weatherstripping if you happen to live in a very hot or cold area.
The standard press in kerf weatherstripping could be combined with a spring bronze weatherstrip if you are looking for a very tight seal.

You can also use this style of kerf-in foam compression weatherstripping. It installs into a routed groove and provides an excellent air seal, especially on irregular surfaces.

In order to cut the groove to install this type of weather stripping, you will need a tablesaw or a router with a 1/8" straight bit.
Combined weatherstripping would look something like this.

Cutting a window sash on a tablesaw can be a dangerous operation if you do not have the proper in-feed and out-feed support. You will have to turn the window sash on its side to make the cut. If you don't have carpentry experience and don't know how to make this cut safely, contact a local carpenter to do this.
Weather Sealing Between Two Sashes
In the area I live in, I rarely, if ever see sashes that are weather-sealed between the bottom and the top sash. Just because it is not a common thing to do in the temperate climate of Central California does not mean that you can't or shouldn't do it. Especially if you notice a lot of cold air getting through in this location. In the illustration below the two sashes seal with an interlocking mechanism but that is not the only way to do this.

Between the meeting rails you could use stick-on Felt Weather Stripping Tape. While this is not as permanent of a solution as having interlocking metal weatherstripping on your meeting rails it works well and does not require you to remove your window sashes or make any cuts.

Reassembling the Window:
- Attach sash cords with a set screw making sure to use the proper length screw, making sure not to go so deep as to hit the glass.
- Reinstall the upper sash followed by the lower sash.
- Reattach interior trim securely.
Final Thoughts
Repairing double-hung sash windows not only preserves your home's beauty and historical value but also promotes better energy efficiency. By following this guide carefully, you can successfully restore your windows to optimal function, save money, and enhance your home's appeal. Patience and thoroughness throughout the process ensure rewarding and long-lasting results.
Frequently Asked Questions
What are double-hung sash windows? Windows featuring two vertically sliding sections (sashes) that improve ventilation and accessibility.
What are common problems with sash windows? Stuck or hard-to-move sashes, drafts, broken panes, peeling paint, broken cords and loose lower rail.
Why choose repairs over replacements? Repairing saves costs, and makes sense to do if your windows are still sound structurally.
What essential tools are needed? Table saw, miter saw or hand saw, pliers (optional duck bill pliers), box cutter, putty knife, screwdriver, sandpaper, paintbrushes, and protective gear.
How is a sash removed? Remove the interior stop, it will typically be held in by caulk, paint and finish nails. Detach sash cords carefully, and label all parts clearly for reinstallation.
What if my window won't open? Inspect for paint sealing the window shut or check for damaged sash cords; gently pry or clamp open if necessary.